Don't you find the idea of designing your own fabric fascinating? In this hand-printed tea-towel tutorial you will learn not only how to block print on fabric but also how to create your own geometrical stamps. No special skills needed to hand-print your own super-cute tea towels. It's super easy!
Supplies

- Tea towels, white 100% cotton/ linen 50 x 70 cm (19.7 x 27.6 inches).
- Three or four erasers or one or two potatoes.
- Blade cutter.
- Stamping block or flat piece of wood or jam jar lid.
- Strong glue.
- Acrylic paints in the colors of your choice.
- Acrylic textile medium for printing.
- Printing roller or foam paint brush,
- Non-porous surface.
- Paint tray.
- Iron.
You could also sew your own tea towels with a sewing machine. If you do, just use absorbent cotton or linen fabric. In any case, make sure your tea towels are washed, dried, and ironed before printing.
To get started, you need a big clean surface to work on, like a table top. Just throw down a plastic sheet to protect it from staining.
Step 1: Sketch Your Design

So first things first, define your design. Decide what shapes you want and how they will be laid out on your tea towel. I suggest you use simple geometric designs like triangles, circles and squares. It's good to have a general idea of your final product right from the start, but you can always fine tune it later on.
Step 2: Form Triangular Stamps From Erasers

Take the eraser and cut it diagonally. Make sure to keep your cutter perpendicular to the cutting surface.

Now you have two triangular pieces of eraser. Put them back together to form again the initial rectangular. This time cut the other diagonal.

At this point you should have four triangular pieces to make your stamping block.

Continue by cutting in the same way with the other two erasers. You'll end up with 12 individual triangular pieces in total.
Step 3: Create the Printing Block

By creating a stamping block you can print a repetitive pattern more effectively and efficiently. Take a piece of wood with a flat even surface. Now, take your triangular pieces and arrange them on your block. Play around with them until you are happy with the result. Remember to create a stamp that will help you get to the desired design of your towel.

Glue the pieces one by one into position. It will help if you start gluing them attached to the left-hand corner, so that you know where your design starts while printing.
Tip: Start gluing your pieces attached to the left-hand corner of your block.

Make sure to carefully aline your pieces for a perfect geometric result.


You can use any other flat and thick material as a base for your block, as long as it is stable and you can hold it easily. For example, I used a jam jar lid as a base for my stamp. To create an arrow, I glued together the two eraser arrows one mirroring the other and with two edges attached together.
Once you figure out how block printing works, you can try carving a more complicated design on a linoleum, rubber or cardboard block. If you try it, just remember that your design will be reversed when you print it!
Step 4: Make Circular Stamps From Potatoes

If you would like to create a circular stamp, an eraser is not the best carving material. Instead, you can achieve the circular imprint by using potatoes. The circle of course will not be geometrically perfect, but it will have a lovely organic shape. So take the potato and cut it twice with straight cuts perpendicular to the length of the potato.
If you cut only once you will end up with the same shape twice. With two cuts you have two different intersections of the potato, meaning two different sized circles. Keep the two end parts of the potato which are easier to hold. You don't really need the middle part of the potato for this project. (But you can always eat it!)
Step 5: Mix the Colours

If you want to create your own shades, mix the acrylic paint first. I used pale olive green and turquoise. Once you've sorted out the shades, mix the acrylic colour in the paint tray with the acrylic textile medium for printing in a 1:1 analogy (one part paint to one part medium). The medium gives fine colour definition and excellent colour fastness for more than twenty washes.
Step 6: Roll the Paint

Roll the paint evenly on a flat surface using the printing roller. You can do this inside the paint tray, if it has no lines.
Step 7: Apply Paint to the Stamp


Apply your paint on the stamping block by rolling with the roll or by using the foam paint brush. Try to apply the colour as evenly as possible on the stamp.
Tip: Try to apply the colour as evenly as possible on the stamp.
Step 8: Print the Fabric

First lay your towel on the printing surface. You can even stick it down with masking tape on all four sides to prevent it from slipping or wrinkling. Position the stamp in the correct spot and press it down.

For a repetitive design, check that your design is aligned with the existing printed design before placing the stamp down.

Make sure to press the stamp evenly on the fabric.

Keep on printing and have fun! When your towels are ready, clean your equipment with water.
Tip: Make sure to press the stamp evenly on the fabric.
Step 9: Let Dry and Iron

Let the towels dry for 24 hours. When dry, iron them to ensure the paint will stay put. Make sure you place piece of spare fabric between your printed design and the iron to prevent direct contact.
Step 10: It's Tea-Time!
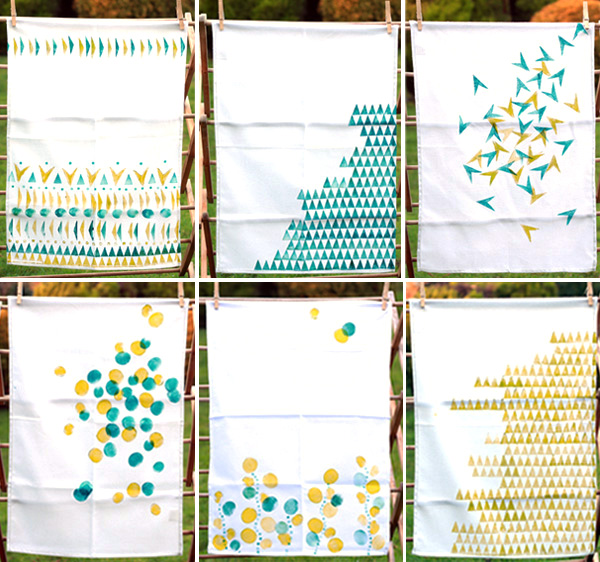

I made six towels with six different geometric designs and I'm really happy with them! I'm sure your hand-printed tea towels will bring some art to your everyday life. Enjoy!
Have you made your own block prints before? Or is this your first time? Do you have any tips or questions? Let us know in the comments below.
Original article and pictures take static.tutsplus.com site
Комментариев нет:
Отправить комментарий