**UPDATE! If you have any trouble making your walls snazzy, visit my FAQ post on this tutorial. I got lots of questions, so there're all here for you should you need some help.**
![](https://blogger.googleusercontent.com/img/b/R29vZ2xl/AVvXsEjeuv3mmPLTGgP-umXFcpA2FHVuElcDqQbLvIuE29smb_TiS1OKqRN00DXdCHY0ruHm6FNTZD9VdwUavEDGBRRkmYbm9rQ1aPiGUnkDB5NGD8DfhIT7rPAKd477XSGaHu5FjAzS7Er-gPw/s640/DIY_Wall_Stencil_Before.jpg)
![](https://blogger.googleusercontent.com/img/b/R29vZ2xl/AVvXsEiPxTjn_J9y__rPmGb7TlIiaWGygMGHtZ21a3MPGdzJQnM0GEql2awpiz03R1hYWr4UPKY7-5JIctufPUuPSjumQ9cEdH7gK6W887Qz_JFAlyju_tEuiXgZJ9hnhCUqPoNDnufulVrmx2w/s640/DIY_Wall_Stencil_After.jpg)
I jazzed up my wall with a DIY Moroccan-style pattern. And, the best part about this project?... it was completely free. One Pampers box and some leftover paint later and I really like my wall :)
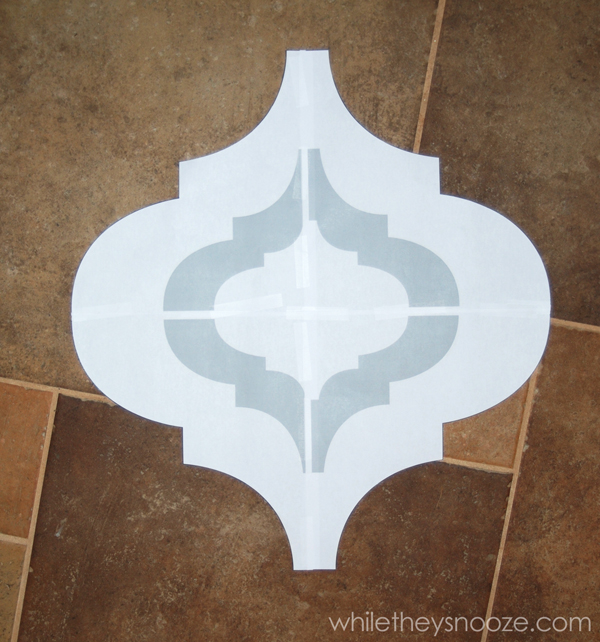
1. Find a Moroccan-ish shape you like online and print it out whatever size you want (Google images is a good place to go). The larger you go... the less work it is. I had to tile mine onto 4 sheets of paper, then tape them together. Don't worry about the design being all blurry if it is, you can fix that in a minute. Once it's all taped, fold the paper in quarters and cut out your shape. When you unfold it, you will have a symmetrical pattern even if it started off blurry. Here is the shape I used if you want to do the same.
![](https://blogger.googleusercontent.com/img/b/R29vZ2xl/AVvXsEhdCmBxJR4FbEZBMZWeNt9WjyoBCf4yqSF1NdLX_Q7BXRUzX2-cF_Rrhl4mjbCxCFH_5rCm8Bghuw53Ij45-zCpOiV3gy6MyUG7O6bKWxOQSJjo_wB5UK-c6W_BFT2bxHiLF8ZOv5q9c3kE/s640/morrocan_pattern.jpg)
![](https://blogger.googleusercontent.com/img/b/R29vZ2xl/AVvXsEjLBsw_qvRcFq7_ejdOJ2_Cyf-E-_Ryw77eIuv0swvqhWAExb9HRWgEWmdgPdKdbFMDUUEd9VGyKhBXY5H-LFA89n4IOnAnGgefE1-GDTAaIq8-sw0YLzVUNYGXSL9lhU_tCHfKf4828Qg/s640/DIY_Moroccan_Stencil.jpg)
2. Trace your shape onto cardboard and cut it out. This is where my Pampers box (and assistant) came into play.
![](https://blogger.googleusercontent.com/img/b/R29vZ2xl/AVvXsEhZlYmAFktSB3WfUd6GymN2YMf4aOEigaTQYLrkhyphenhyphenbefwLKLXHIuWOxk3BMXbisgY0GOX5t0Vf77Bp5srho2bsW-Du4IxHU5e67wFBDyiOQXHN9vPBO_mnf4uHF8Ak3zgHaEJ-fj5NSbVc/s640/DIY_Wall_Stencil_Moroccan_Help.jpg)
3. Step 3 is an important one, and I think the reason I had no wonky pattern happening. I taped a level to my stencil. This way, I traced it onto the wall perfectly straight every time. Worked out awesome.
![](https://blogger.googleusercontent.com/img/b/R29vZ2xl/AVvXsEjnc51TBiIiZnErM6SD0BTyNK_CQZFoWZ2ibcB1Of9qDaRuX_AxkPzY7XAXfyHVUitSyc2ZAmsN-FnKkj14EOuVNb7tDW8WsgSLSzBtGdIo9A2kBiyAeA-QGQSFXnER3_a1PWhPtAxOvtoj/s640/Moroccan_Stencil.jpg)
4. Pick a spot on your wall to start tracing lightly with a pencil. I eyeballed where my stencil would end up on each end of the wall and made sure I started in a place that would have me end in a half pattern on each side. Did that make sense? It really doesn't matter. I just preferred no tiny slivers on the sides.
![](https://blogger.googleusercontent.com/img/b/R29vZ2xl/AVvXsEgEN9SssvmtdujMsOuc_87cvydmlkqLZJq7W0War5AxOs_TgZ5IIO82HoKG5rCalH2NqXKnyaZEwTW66VxJS_sQgvwJccEfDXz6YC61fQgrgt8dx-udbXw_Ch8dzsxg2DFpih3ZoaX4CRtH/s640/Wall_Stencil_2.jpg)
(In these pictures I already went over some of my pencil lines with the paint)
![](https://blogger.googleusercontent.com/img/b/R29vZ2xl/AVvXsEgeKOaTdrLoHqlgjpDaUQL2NhPqkjnUH6WkdCw0fKBGhxgawSyiNj4zGMRYV442aJTbp4fGeJPmtegSwx5C19o1YETJ0Qj50YFmZDz9KtQsYbkQ6qqM531UX2DJFSaMRPZ6yX-OrItyPXk/s640/Wall_Stencil_1.jpg)
5. Once you traced everything with a pencil, (took me a few nights while they snoozed) grab a small brush and go over the lines with paint. That's it!
![](https://blogger.googleusercontent.com/img/b/R29vZ2xl/AVvXsEg_DOa2b1GNaLEGedWQS9q7xocsF_56ajz-1i-GVvrzGFfRvkxy6Y2-bwqDf65XGxZHE8WecOFz-N3d-VrcaZhZ8-n6Gd0t_JldcKpUpDZ1ZtdMtHwBhRo4SCGrQ1jsnxnHOwVwucahUT4/s640/DIY_Wall_Stencil_3.jpg)
![](https://blogger.googleusercontent.com/img/b/R29vZ2xl/AVvXsEgXzGVWlS4x4v5KMAkqfOMEdnR8ixHSM8pa3mBNCE2tZ5FFBmsSfkt1n4vU4t1M66hOT1AUvGY6WqddZwIGGIDLQMVmNzGUJxCi-zX-7uEmGluSLuSiw6Xd12Azw3W72mgUaYz3AVjoc1k/s640/DIY_Wall_Stencil_4.jpg)
I'm sad to say that just a few weeks after I finished my wall... we sold our house and moved! (Which explains the lack of posts in a while... and the crappy iPhone picture of the "after") Oh well. It was good practice and I will definitely be doing this again in our next house. I love how it turned out.
If you're in to easy and inexpensive DIYs, here's a few more I've done around my house.
![](https://blogger.googleusercontent.com/img/b/R29vZ2xl/AVvXsEjQGcDlN9JWDAGJFMmak7hsPzuanh1xTVn-NQwnXL-tFxyE-lLQzAr2MbKMdjoMPjKK7CBoc78bk2QEq9oxMcZxZMFKInjWfATo1shUMfi2Nj8hm9mq_aa5Jq8cDOEP585cYcxYtz3IOSpn/s200/Tutorial_chair.jpg)
![](https://blogger.googleusercontent.com/img/b/R29vZ2xl/AVvXsEge8MjogG9Ef-LWH58jWuaaKE31ccaujgd7UgMlVPRaUT5k_fmgQ8e5TKRcoQLGAj-KUU79c1de9t_U2ZUB1ltYRSTopC0UKFnhgsopSYSYoejsUFzXHHbY6XTiC2QXCriOYweHxoqeV6Ma/s200/Tutorial_curtains.jpg)
![](https://blogger.googleusercontent.com/img/b/R29vZ2xl/AVvXsEhmSmycaDaLTMUgDjHLxuNYrIkFQ3E7Gpc9L9KvwQ1-ZaRHOi32iOVRqvSErqLZUiBijo9jnVOkiFmWzGrqz0OaYZ9x6YY0BFHTpe7CAGpAkKRkut8fU5gmJOe-GfdfUpjbasQz37XCDoX0/s200/Tutorial_Art.jpg)
Original article and pictures take whiletheysnooze.blogspot.com site
Комментариев нет:
Отправить комментарий